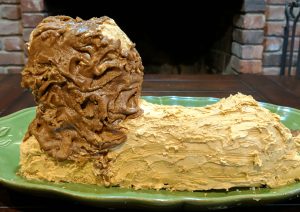
My son is a big fan of big cats, and I’ve been secretly hoping for him to ask for one for his birthday cake for a couple of years now. I thought when he finally did it would be a cheetah (his favorite animal overall) or a tiger, but he surprised me by asking for a lion for his 6th birthday. (I have since learned that lions briefly became his new favorite animal, before relatively quickly being replaced by the fox.)
In like a lamb…
Rather than building up the cake by layering and trimming a bunch of sheet cakes, I thought I could try adapting my lamb cake mold. The Internet told me this has been done, so I figured I’d try my own take on it.
First, even though in the original year of cake I asserted that a (dry yet structurally sound) pound cake recipe was necessary for such a mold, I decided for this one to try a one with a little more moisture and went for a basic yellow cake. Since I was going to have to do some reconstructive surgery anyway, I figured I could prop him up if in fact a moister cake couldn’t hold up the head.
I was debating between the 1-2-3-4 Cake recipe available on Swans Down Cake packages (which I have made before, for his Ironman cake last year that I never posted about, not to be confused with the Ironcake for my actual Ironman athlete friend) and the yellow cake recipe from Joy of Cooking. They are practically identical, but the Joy uses 1/2 cup more flour, 1/4 tsp more salt, and 1 tsp more baking powder.
I wanted to make sure to have enough to fill the mold and have extra to build out legs, so I did 1.5 recipes, mostly of the Joy’s yellow cake, but I rounded off the flour, so I used:
- 1 1/2 C. butter (3 sticks)
- 3 C. Sugar
- 6 eggs
- 5 C cake flour
- 1/2 tsp salt
- 2 Tbsp baking powder
- 1.5 C milk
- 1 1/2 tsp vanilla
This was more than I needed. I got the full lamb cake mold (approx 5 C capacity), a 6×10 sheet pan (2L pyrex), and 8 cupcakes. I baked the lamb for ~50 minutes at 325. There ended up being one big crack in the neck on the cooling racks, but I had no structural issues when I put it together.
Ears and appendages
Two main adjustments to the lamb shape to become a lion: the ears needed to be higher, and the legs needed to be visible, since lions do not daintily tuck their legs under themselves like lambs.
Ears first: I set iTunes to “Stuck in the Middle with You” for inspiration and got to work. I glued them on top with a bit of frosting and they held very well.

For the legs I didn’t so much have a plan as just start cutting shapes from the spare layer and trimming them until they looked reasonable.
Of course they didn’t look that reasonable, so I needed to finesse them a bit. I crumbled some of the remaining cake and mixed in a couple spoonfuls of frosting to make them into a dough (this is what cake balls/cake pops are made of. Except instead of dipping them in chocolate and sprinkles I smeared them onto a lion).
 I then used that to attach the legs, sculpt the face, and roll out a tail.
I added some brown and yellow food coloring to a batch of my white chocolate frosting to make it lion colored and smeared it over the whole cake, adding more cake ball dough as necessary to patch. The legs were crumbling and really didn’t want to take any more shaping, so they ended up flatter than I wanted.
I applied the frosting with a spatula and then smoothed it with my fondant knife tool.
Then I needed to make the caramel frosting for the mane. I used the recipe from my mother-in-law (caramel frosting recipe here).
Originally I thought I’d use the grass frosting tip to make little lion hairs. Maybe that would have worked if I’d taken the time to sift the powdered sugar, but I didn’t so it didn’t. I went through 4 progressively larger tips before I gave up entirely on piping the frosting on, and I just piled it.

Then I used the modeling stick from the gum paste tool kit to sort of swirl it, and it totally turned out much better than I ever expected!
I dyed some of the remaining caramel frosting black for the facial features and claws.
My son was super excited. When he got his choice of what he wanted for the first piece, he decided to eat the face.


[…] the top layer to make an angle. I used the same caramel frosting recipe as the mane for the lion cake, which was enough to awkwardly cover the base and to put between the tree trunk layers, but it […]
LikeLike